Monday, 16 June 2014

Sew Sew


my year threes, fours and fives are busily working on their textile project which started some time ago. We developed a design and made a print on fabric. We have been exploring and learning different types of embroidery stitches. I have this on my interactive white board for them to refer to along with a set of sewing cards for a range of other stitches if they want. My plan is to make some little movies demonstrating how to do each stitch so that the children can go to the board and by touching the illustration they are given an individual instruction when they need it - I just have to figure out how to do that! ;)
 Each year level has a certain number of different stitches to aim for. 
 Year 3 need to work on the running stitch family of stitches and have a go at stem stitch and one "tricky" stitch if they would like to. 
 
Year fives are expected to be able to do the running stitches and stem stitch plus one of the tricky ones. I have set these targets because I realised that a lot of the kids were saying "This is hard" and giving up really quickly when challenged by something that wasn't really hard but actually just required some concentration and a little perseverance.
 
 Having said this within each class there are some kids who do have extra challenges to face whether it be physical or just down to a lack of confidence or experience with a certain skill, so several children have their own specific goals that I will negotiate with them along the way.
 
My father was an artist and a teacher also, he worked in many contexts - as I have done but at one stage he worked with young kids with disabilities at Rocky Bay, some of these children were born without arms or legs so for an art teacher this was a big challenge, but this didn't stop my father from looking for the positives finding ways to see what they could do rather than focusing on what they couldn't do. 
 
This stuck in my impressionable young mind and to this day I try as much as I can to help children see beyond what they can't do to find ways of doing things that works for them - whether it means insisting that they have just one more go at threading that needle for themselves 
 
or finding ways for them to hold a tool in a way that works for them 
 
or finding something that might support them and make the job just a little easier. 
 
The look on their faces when they actually achieve something for themselves is priceless.

The photos used here are from my year 4/5 class.


Tuesday, 10 June 2014

Chinoiserie

 
Two of our upper primary classes have been looking at how Chinese culture has influenced western culture. Some of the children had studied China in Social studies so we discussed some of the important things that Chinese culture has given the world, like the compass, gunpowder,
paper and silk and of course china.
We looked a typical blue and white china designs.
I played a bit of a trick by showing the class the willow plate. They immediately guessed that it came from China. They were surprised to find out that the famous willow pattern china is actually English.
 It came as a result of people being interested in things from china and it became fashionable to imitate the Chinese style in other countries.
We watched this animated version of the Chinese story that inspired the plate design.
Then we had a go at creating some of our own. Firstly we sketched some ideas in our visual diaries, taking care to copy the patterns and shapes of designs that made the plates look Chinese.
We used blue, black and white acrylic paint to create shades (adding black) and tints (adding white) of blue.
delightful aren't they?
 
These are from my year 6/7 class.

Friday, 9 May 2014

Klee Cityscape

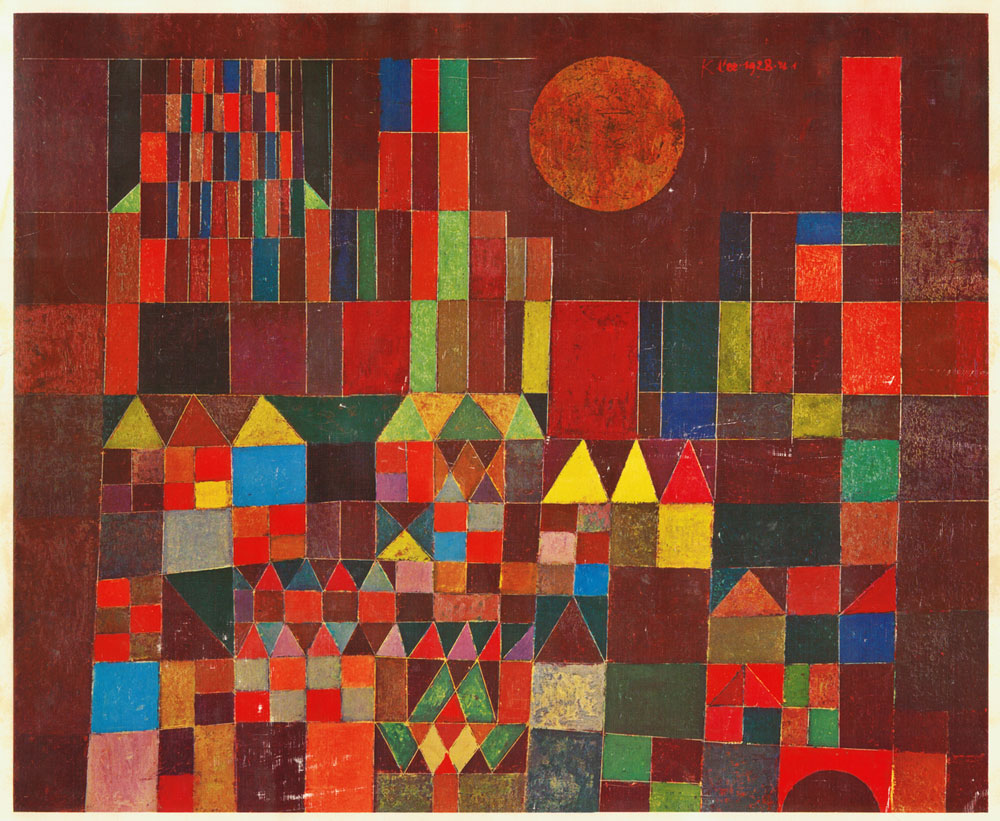
With this project we started by looking at some of Paul Klee's cityscape paintings, with a particular focus those using geometric shapes. we developed our ideas in our visual diaries and made collage cityscapes using colourful paper. You can see these here if you would like to check back.


This term we are developing this theme further by using some geometric stamp shapes I made with a pile of cheap erasers bought from a 'bargain basement $2 shop' (it was even more of a bargain because a pack of 8 cost $1!!!)

I started by demonstrating to the children how to print with the stamps. As they had had some practise making buildings using 2D regular maths  shapes and had created their collage using regular geometric shapes most of them had a very clear idea of what to do.

 
The children then printed onto strips of felt using fabric ink, leaving the washed stamps looking like this! D:

They are now using the short pieces of felt as a sampler to practise stitches on before moving on to embellish their long strip of fabric.


The long pieces once decorated will be folded as shown in the photo to become the pencil case to store their art room equipment in. These should easily last them till the end of  primary school. 


*** Here's a tip for anyone trying this at home.
I tried putting the ink under a sponge to make a stamp pad, it did not work very well with the fabric ink and felt. The best way was to give the kids a plate with a spoonful of ink and a paintbrush. They painted the ink onto the 'stamp' and pressed it onto the fabric. This gave a much better result.

Preparing to print!


At last! Every child has their printmaking plate ready to go. There is no swimming lessons, or sport's events or any other excursions - that I know of!  (There's NAPLAN but fortunately not too many class changes as a result!)

 
 First we explored taking a line for a walk (Paul Klee style) then made up 'rules' for taking our lines for a walk creating patterns  that were then used to create designs for printmaking. You can see in Megs visual diary the process we have been through to develop our printmaking plates.


But now I have to go to a meeting to address some changes that need to happen in our school! Fortunately for me the Emily, the lovely lady stepping in to take my class on Monday is also a friend and was able to pop into the Art studio today (Saturday) and I could give her a quick printmaking tutorial - to give her some tips and clearly show her what we are working on. Thanks Emily!


At the same time I did a few colour tests for the children to see how the colours they have chosen will go together. 

I also made up two examples so they could see that their work could be repeated by simply sliding their design ...

OR by rotating the design.

Same printmaking plate - two very different designs.

These pieces of fabric will be decorated using embroidery stitches then transformed into anything the children want to make. I have said I want to see them print on fabric and use threads to decorate the surface of their work other than that it is up to them. Some children will be making pencil cases - if they are new to the school or have lost the ones they have made last year. Others will be making drawstring bags or cushions. One boy suggested coasters to go under hot drinks on the table, another has bought in a T-shirt so he can stitch his finished piece to the front of that.
I'm looking forward to seeing what they all come up with!

Thursday, 1 May 2014

Perfect fit.

Our school choir will be attending the massed school choir event later this year. One of the songs relates in some way to M.C.Escher (I'm not sure how but I can't wait to see!) Anyway our music specialist asked if I would introduce Escher to the children. So we have interrupted our normal programme to have a quick look at the beautiful intriguing work of Escher.
I have been showing the classes this video - it's not too long but really demonstrates what Escher was all about and how his work links to mathematics.

Although we have taken a bit of a detour by introducing another artist in the middle of a project it actually works really well, a perfect fit in our current programme. Most classes will be almost ready to start their printmaking project, which will be a simple tessellation of a square tile decorated with lines from our investigation of Paul Klee's work .
Printmaking can be a bit of a messy nightmare in a classroom studio with 28 to 32 kids in a class. SO I have come up with a system that uses printmaking stations and allows kids to focus carefully on the printmaking process without other children around them pressuring them for their turn or making a mess of the printmaking area.I majored in printmaking at uni and am the daughter of an artist who also did a lot af printmaking so I can be a bit fussy with how the printmaking is done! I've seen some teachers just let the kids 'go for it' but I'd rather they learn the process well and the importance of keeping the area clean etc.)
I set up printmaking stations and children go to these to print ( containing the mess to a couple of areas ) I have created a set of numbered cards, each child gets one and this tells them which printmaking station they will go to- red green or blue and the order in which they will go. Once a child has finished printmaking they return their card to me an I call out the next number ; green 4 your turn - a bit like waiting in line at the licensing place or medicare!

While children are waiting for their turn to print they go on with another activity. Sometimes this might be a written component reflecting on their own work so far or responding to an art work by an artist related to the topic we are covering. This time they will be creating their own 'Escheresque' tessellations.
Most children have been creating simple square tessellations where a segment is cut from one side of the square and slid across to the opposite side and taped in place to create a template. Here is video tutorial if you'd like to give it a go at home!

One year 7 boy who was intrigued by the tessellations and wanted to try something a little more challenging so we did a quick search and found this video tutorial on how to create rotational tessellations. It is a step by step how to for a computer and we were trying to do it without the programme using our ruler, pencil and a piece of card. So he and I worked together to try and figure it out - it was a bit tricky and he tried hard to make it work and is going to keep trying at home. It was quite challenging. (I'm glad to say I did manage to figure it out. ) I've included the video just in case you want to challenge yourself and have a go - maybe you have the programme it refers to!
PS.
Today at recess the boy I mentioned and his friend came to show me that they had figured out the rotating tessellation. 

Well done Alex and Amir!

Monday, 7 April 2014

Building on our experiments.

On my most recent trip to Europe I spent a week in London and whilst there I visited the TATE Modern. An afternoon strolling around the Paul Klee exhibition inspired some ideas for lessons this term.
All classes from year three to seven have been focusing on the art work of Paul Klee. my last post showed how we experimented with lines and mark making. The children in year 4-7 have been working on projects based around "taking their line for a walk" (Paul Klee is renowned for saying a line is a dot that went for a walk and drawing is taking a line for a walk.)

The year threes however have looked at a different style of work by Paul Klee where colour and shape is the focus.
 They started by discussing the painting to identify the types of shapes they could see. This was a great opportunity to link maths and art using the terms to describe the geometric shapes or regular shapes that Klee uses in his art works of this type. We compared them to organic or irregular shapes and recorded this information in their visual diaries.

Then came time to play with some 2D maths shapes to construct and record as many different building shapes usiing the simple squares, rectangles and triangles.
 These ideas were then used to create a colourful collage of buildings on a coloured ground.
They finished by making a quick two sentence reflection on their work in their visual diaries. 
 I like how I ...
But I think it would have been even better if I ....

Monday, 10 March 2014

Trust the Process.

The art studio is not all about a final product. The creative process is very important. Often our lessons will involve discussing the work of others (peers, well known or less known artists from different times or different cultures) from these discussions we develop ideas and practise skills before producing an art work. 

Last week has had a big focus on the creative process - playing with mark making tools, exploring what they can do. There was absolutely no expectation to make anything, except interesting marks on paper. Almost every child from year 4-7 loved this activity.

 
 We recorded what we did in our visual diaries, recreating some of the lines and marks we liked most.

Then came the imagination challenge. The children were asked to spend some time looking into all the scribbly marks on the large sheets in front of them to find hidden creatures or plants. There were also recorded into their visual diaries and developed into drawings that showed others more clearly what was in their imagination.
 These ideas will be further developed for use in different printmaking and painting activities inspired also by the work of Paul Klee. Different year levels and different classes will be working on slightly different projects although our starting point is the same.